그리드백 레이아웃 관리자는 AWT에서 제공해 주는 레이아웃 관리자 중에서 가장 복잡하고 다양한 형태를 가질 수 있는 레이아웃 관리자입니다. 그리드백 레이아웃 관리자는 HTML 페이지를 생성하기 위해 사용하는 테이블과 같은 방식으로 레이아웃을 수행합니다. 다시 말해서, 레이아웃 영역을 기본적으로 셀 단위로 나누어 놓고, 행과 열에 대해 셀 크기를 확장할 수 있도록 하는 것입니다. 그리드 레이아웃 관리자는 모든 컴포넌트가 같은 크기의 셀에 위치되고 크기 변경이 불가능하지만, 그리드백 레이아웃 관리자는 셀 단위의 레이아웃을 행하기는 하지만 각 컴포넌트가 서로 다른 크기를 가질 수 있도록 할 수 있습니다.
다음에 나오는 자바 프로그램은 그리드백 레이아웃 관리자의 사용을 보여주는 간단한 프로그램입니다.
|
import java.awt.*; public class GridBagLayoutTest extends Frame { TextField smtpServer, mailFrom, rcptTo, subject; TextArea body; GridBagLayout gbl; GridBagConstraints gbc; public GridBagLayoutTest() { smtpServer = new TextField(40); mailFrom = new TextField(40); rcptTo = new TextField(40); subject = new TextField(40); body = new TextArea(5, 40); gbl = new GridBagLayout(); gbc = new GridBagConstraints(); setLayout(gbl); gbc.fill = GridBagConstraints.BOTH; gbc.weightx = 1.0; gbc.weighty = 1.0; add(new Label("메일서버: ", Label.RIGHT), 0, 0, 1, 1); add(smtpServer, 1, 0, 3, 1); add(new Label("From: ", Label.RIGHT), 0, 1, 1, 1); add( mailFrom, 1, 1, 3, 1); add(new Label("To: ", Label.RIGHT), 0, 2, 1, 1); add(rcptTo, 1, 2, 3, 1); add(new Label("제 목: ", Label.RIGHT), 0, 3, 1, 1); add(subject, 1, 3, 3, 1); add(new Label("내 용: ", Label.RIGHT), 0, 4, 1, 1); add(body, 1, 4, 1, 1); add(new Button("Send"), 0, 5, 2, 1); pack(); // setSize(400, 300); } private void add(Component c, int x, int y, int w, int h) { gbc.gridx = x; gbc.gridy = y; gbc.gridwidth = w; gbc.gridheight = h; gbl.setConstraints(c, gbc); add(c); } public static void main(String args[]) { GridBagLayoutTest f = new GridBagLayoutTest(); f.setTitle("GridBagLayout"); f.setVisible(true); } } /* * Results: D:\AIIT\JAVA\Working\08>java GridBagLayoutTest
D:\AIIT\JAVA\Working\08> |
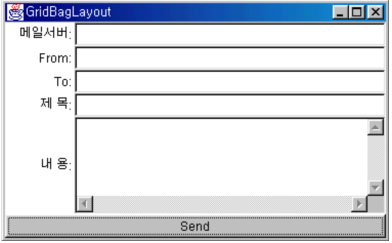
<프로그램 19. GridBagLayoutTest.java>
그리드백 레이아웃 관리자가 컴포넌트들에 대한 레이아웃을 행할 때, 각 컴포넌트가 차지하는 셀의 위치, 수평 크기, 수직 크기 등을 설정해 주어야 하는데, 이를 위해 자바에서는 GridBagConstraints 클래스를 제공해 줍니다. 먼저, GridBagConstraints 클래스가 제공해주는 기능을 살펴보도록 하겠습니다.
l GridBagConstraints.gridx, GridBagConstraints.gridy: 컴포넌트가 위치할 셀의 x 값과 y 값을 나타내며, 가장 왼쪽 위 셀의 gridx과 gridy 값은 0입니다. 컴포넌트를 순서대로 위치시키고자 할 때는 GridBagConstraints.RELATIVE를 사용합니다.
l GridBagConstraints.gridwidth, GridBagConstraints.gridheight: 컴포넌트가 차지할 너비와 높이를 나타내는 셀의 개수이며, 디폴트 값은 1입니다. gridwidth를 GridBagConstraints.REMAINDER 값으로 설정하면 현재 행의 마지막 셀이되고, gridheight 를 GridBagConstraints.REMAINDER 값으로 설정하면 현재 열의 마지막 셀이됩니다. gridwidth를 GridBagConstraints. RELATIVE 값으로 설정하면 현재 행의 다음 셀부터 마지막 셀까지 차지하고, gridheight 를 GridBagConstraints. RELATIVE 값으로 설정하면 현재 열의 다음 셀부터 마지막 셀까지 차지하도록 합니다.
l GridBagConstraints.fill: 컴포넌트의 디스플레이 영역이 컴포넌트가 요청한 크기보다 클 때, 크기설정을 다시 할 것인가를 결정합니다. GridBagConstraints 클래스는 다음과 같은 값을 가능한 값으로 제공해 주고 있습니다.
l GridBagConstraints.NONE: 디폴트 값
l GridBagConstraints.HORIZONTAL: 수평적으로 확장하고 수직적으로는 확장하지 않습니다.
l GridBagConstraints. VERTICAL: 수직적으로 확장하고 수평적으로는 확장하지 않습니다.
l GridBagConstraints.BOTH: 수평 및 수직으로 확장합니다.
l GridBagConstraints.ipadx, GridBagConstraints.ipady: 컴포넌트 너비의 최소값에 (ipadx * 2) 픽셀을 더하고, 컴포넌트 높이의 최소값에 (ipady * 2) 픽셀을 더합니다.
l GridBagConstraints.insets: 컴포넌트와 디스플레이 영역의 엣지 사이의 공간의 크기를 나타내고, 다음과 같은 값을 GridBagConstraints 클래스에서 제공해 줍니다.
l GridBagConstraints.anchor: 컴포넌트가 디스플레이 영역보다 작을 때, 컴포넌트가 위치할 위치를 나타냅니다. 이 값으로는 GridBagConstraints.CENTER(디폴트 값), GridBagConstraints.NORTH, GridBagConstraints.NORTHEAST, GridBagConstraints.EAST, GridBagConstraints.SOUTHEAST, GridBagConstraints.SOUTH, GridBagConstraints.SOUTHWEST, GridBagConstraints.WEST, and GridBagConstraints.NORTHWEST. 등이 있습니다.
l GridBagConstraints.weightx, GridBagConstraints.weighty: 컴포넌트의 디스플레이 영역이 컴포넌트가 요청한 크기보다 클 때 남는 영역을 각 컴포넌트들에게 배분해 주어야 하는데, 이 때 컴포넌트가 차지할 너비(weightx)와 높이(weighty)에 대한 웨이트(weight)를 나타냅니다. 이 너비와 높이에 대한 웨이트는 각 컴포넌트마다 달리 줄 수 있습니다. 만약, 모든 컴포넌트의 너비와 높이에 대한 웨이트가 0이면, 디스플레이 영역이 커지더라도(사용자가 윈도우의 창을 키울 때) 각 컴포넌트에 배당되는 영역이 없으므로 모든 컴포넌트들은 한군데 위치하게 되고 남는 영역은 그냥 빈공간으로 나타나게 됩니다.
다음에 나오는 자바 프로그램은 GridBagConstraints 객체의 값을 적당하게 설정하여 각 컴포넌트를 컨테이너에 등록한 후, 그리드백 레이아웃 관리자를 이용하여 보여주는 프로그램입니다.
|
import java.awt.*; class GridBagLayoutTest2 extends Frame { public GridBagLayoutTest2() { GridBagLayout gridbag = new GridBagLayout(); GridBagConstraints c = new GridBagConstraints(); setLayout(gridbag); c.ipadx = 8; c.ipadx = 8; c.fill = GridBagConstraints.BOTH; c.weightx = 1.0; c.weighty = 1.0; makebutton("Button1", gridbag, c); makebutton("Button2", gridbag, c); makebutton("Button3", gridbag, c); c.gridwidth = GridBagConstraints.REMAINDER; //end row c.weightx = 0.5; c.weighty = 0.5; makebutton("Button4", gridbag, c); c.fill = GridBagConstraints.BOTH; c.weightx = 0.0; c.weighty = 0.0; //reset to the default makebutton("Button5", gridbag, c); //another row c.gridwidth = GridBagConstraints.RELATIVE; //next-to-last in row makebutton("Button6", gridbag, c); c.gridwidth = GridBagConstraints.REMAINDER; //end row c.weightx = 0.75; c.weighty = 0.75; makebutton("Button7", gridbag, c); c.gridwidth = 1; //reset to the default c.gridheight = 2; c.weightx = 0.25; c.weighty = 0.25; makebutton("Button8", gridbag, c); c.weighty = 0.0; //reset to the default c.gridwidth = GridBagConstraints.REMAINDER; //end row c.gridheight = 1; //reset to the default makebutton("Button9", gridbag, c); makebutton("Button10", gridbag, c); setSize(300, 100); } protected void makebutton(String name, GridBagLayout gridbag, GridBagConstraints c) { Button button = new Button(name); gridbag.setConstraints(button, c); add(button); } public static void main(String args[]) { GridBagLayoutTest2 f = new GridBagLayoutTest2(); f.pack(); f.setTitle("GridBagLayout2"); f.setVisible(true); } } /* * Results: D:\AIIT\JAVA\Working\08>java GridBagLayoutTest2
D:\AIIT\JAVA\Working\08> */ |
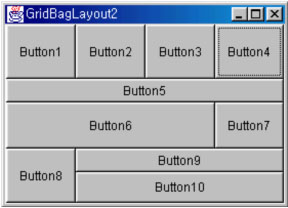
<프로그램 20. GridBagLayoutTest2.java>
위의 자바 프로그램을 실행한 후, 윈도우의 크기를 적당하게 조절해 보면, 주어진 웨이트에 따라 남는 영역이 배분되므로 각 컴포넌트의 크기가 웨이트에 따라 변하게 됨을 알 수 있습니다. 그리고, GridBagConstraints.REMAINDER와 GridBagConstraints. RELATIVE의 차이점도 볼 수 있습니다.
GridBagLayout 클래스의 객체 생성자와 주요 메소드를 살펴보면 다음과 같습니다.
l GridBagLayout(): 그리드백 레이아웃 관리자를 생성합니다.
l void addLayoutComponent(Component comp, Object constraints): 주어진 컴포넌트를 주어진 constraints 객체를 이용하여 추가합니다.
l void addLayoutComponent(String name, Component comp): 주어진 이름으로 컴포넌트를 추가합니다.
l GridBagConstraints getConstraints(Component comp): 주어진 컴포넌트에 연결된 GridBagConstraints 객체를 얻습니다.
l Point getLayoutOrigin(): 레이아웃 그리드의 시작 위치값을 얻스비다.
l double[][] getLayoutWeights(): 레이아웃 그리드의 행과 열이 갖는 웨이트 배열을 얻습니다.
l void invalidateLayout(Container target): 레이아웃을 무효화(invalidate) 합니다.
l void layoutContainer(Container parent): 이 그리드백 레이아웃 관리자를 이용하여 주어진 컨테이너를 레이아웃 합니다.
l void removeLayoutComponent(Component comp): 주어진 컴포넌트를 제거합니다.
l void setConstraints(Component comp, GridBagConstraints constraints): 주어진 컴포넌트를 위한 constraints를 설정합니다.